Donnerstag, 28. Juli 2011

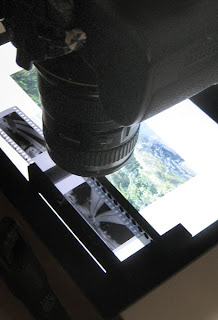
Self made analog 35mm Film scanner


what you need
  • laptop // set the background color on white
  • some LEGO stones
  • DSLR
  • Macro lens
  • tripod


How to
  1. as amble some LEGO Stones together like the photo.
  2. Bring your film in your LEGO holder.
  3. set your laptop background color with.
  4. Set your laptop screen horizontal on a table.
  5. Adjust your DSLR cam parallel to the film and laptop screen.
  6. Tate photos from the film. Use manual mode. If your photos smaller than the hole film take photos from each part of the negative and stitch it in a graphic software on your computer together.

Finish your photo from the analog film in Photoshop

invert black&withe film: 
  • Image>adjustment>invert.

Invert color film: 
  • Image>adjustment>invert.
  • Image >adjustment > levels (auto levels)
the second step is important, than your withe point from the film is a kind of orange. Your color will be wrong with out the second step!!

Here a samples photo how I digitalis with this technique. I took 12 photos from the negative with a 5dmarkII (21mpixel), and I get around 170mpixel digital photo...


Dienstag, 26. Juli 2011

Very light nodal point adapter for my DSLR

I build me a new “nodal point “ adapter with just 129 gram inkluding fast change plate for gitzo head. For canon 16-35mm USM II objective on a 5D mark II. Its possible to use the camera horizontal an vertical. This adapter is for reducing the optical fold in panorama stitch photos.


Freitag, 8. Juli 2011

Sharan-pinhole-camera 35 wide. How to calculate the exposuring time

This is a little how to, to calculate the exposure time for this pinhole camera.

Material list:


Calculate the exposing time:
For that do I use my Motorola DEFY smart phone, and the free app “beeCam Lightmeter”.

//info: I had to adjust the light meter in the menu point “sensor correction” with the value of 10.0. I guess this number is different from phone to phone. To adjust, go out at 12 o'clock on a sunny day and start the app. If you have 100 000 lux the adjusting is right. lux on wiki
ISO set to 100
F to 32.

The app would be perfect if it could be set to f 180. but the maximum is f32. For that reason you have to calculate the expose time from f32 to f180. The factor for that is 32. f stop list on wiki ( exposure time for f32 x 32= exposure time f180)

If you use the ILFORD FP4 film, and got a longer exposure time than a 1/2 second. You have to adjust the exposure time. See the graphic on site 2. pdf
for that reason I done this smal table.

On the left is the time from the “ beeCam Lightmeter app” ISO= 100, f32. In the middle, the time for f 180 and right the time with the adjustment for the ILFORD film.


Now you are ready to take photos with the sharan pinhole camera.

Sonntag, 24. April 2011

A floss for Basel

This is a little design / possibility study for a floss in Basel. This concept will give more space on the river Rhein. 


Samstag, 12. März 2011

"HOW TO" pier panorama


Why is the picture working and why i chose my camera settings?

camera and settings: CANON EOS 5D MK II, 16-35MM USM II @ 16MM, F/18, 25SEC, ISO-50

  • Set up the camera exact in the middle of the pier to get am symmetric picture.
  • Use a wide angel lens to get a wide view from the area.
  • Set the camera in the ride angel, the pier should not split the horizon waterline.
  • Cut out the picture in a panoramic format. The waterline should not be in the middle of the picture to get a harmonic picture. Use the golden ratio rule. Wikipedia
  • Adjust the camera on a high aperture f/18 to get from the frond till background all in focus.
  • Use a low ISO to get the long exposer time from 25 sec. To bring the lake flat and quiet. Don't forget the tripod.

see the photo in original size on my site: direct link